Previewing your UI design
How to use a live XAML previewer when developing with Avalonia. How to set design-time properties and data to simplify UI development.
Using the XAML previewer
Live XAML previewers are available in JetBrains Rider with the third-party AvaloniaRider plugin, as well as Visual Studio with the Avalonia for Visual Studio plugin. With a XAML previewer, you can view changes to your XAML code as you work. We strongly recommend using one for the best development experience.
Enabling the XAML previewer
To enable the XAML previewer in Rider and Visual Studio:
- Rider
- Visual Studio
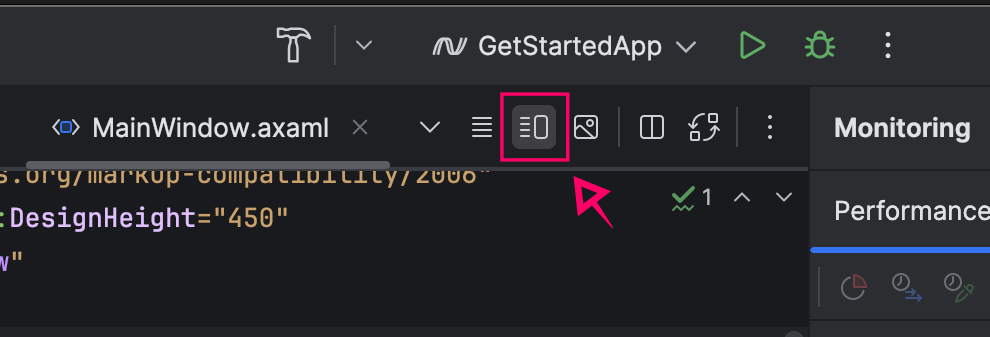
- In Rider, select a .axaml file from the top ribbon.
- On the right side of the top ribbon, click Editor and Preview.
- Build your project.
With the Visual Studio for Avalonia extension, the XAML previewer is usually open by default. If it isn’t, follow these steps to enable it.
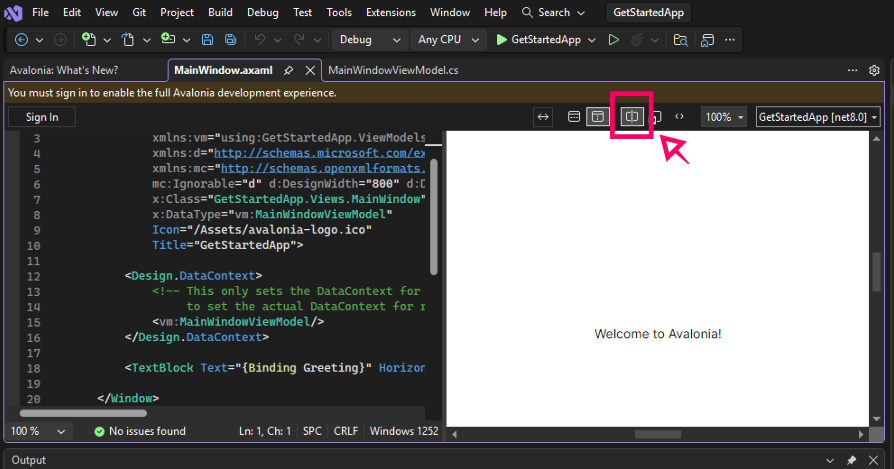
- In Visual Studio, open a .axaml file.
- Click Split View at the top of the editor window.
- Build your project.
Checking it works
- Open any .axaml file. For this example, we’re going to use MainWindow.axaml from the default Avalonia template.
- Locate the
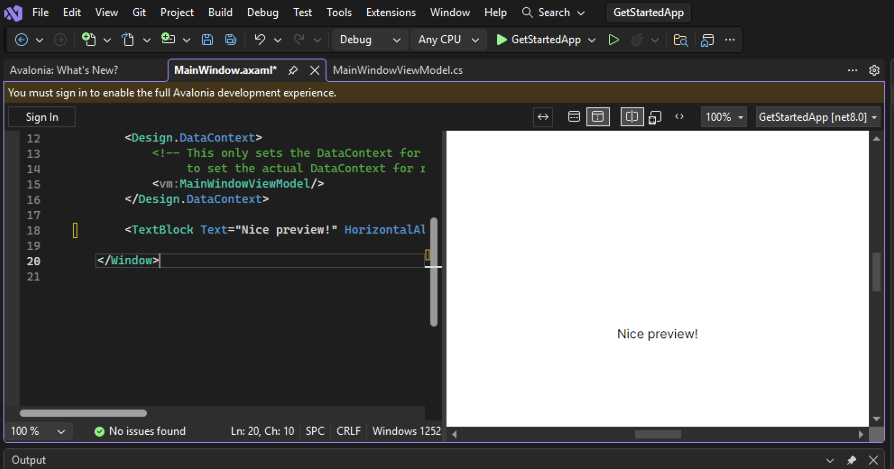
<TextBlock>...</TextBlock>XAML tag near the bottom. - Remove
{Binding Greeting}. Change it to any text, e.g., "Nice preview!" - You should see your text appear in the preview pane as you type.
If the previewer is unresponsive to your changes, try building the project again.
Setting design-time properties
Design-time properties are applied to your UI controls in the XAML previewer only. They do not affect the actual runtime properties of the app. Setting design-time properties helps you style and position your UI without needing to build the app repeatedly.
To use design-time properties, you must add a namespace to your XAML file:
xmlns:d="http://schemas.microsoft.com/expression/blend/2008"
With the namespace added, the following design-time properties become available:
d:DesignWidthd:DesignHeightd:DataContext
DesignWidth and DesignHeight
The d:DesignWidth and d:DesignHeight properties apply the specified width and height to the preview.
<Window xmlns="https://github.com/avaloniaui"
        xmlns:x="http://schemas.microsoft.com/winfx/2006/xaml"
        xmlns:d="http://schemas.microsoft.com/expression/blend/2008"
        d:DesignWidth="800" d:DesignHeight="450"
        x:Class="AvaloniaApplication1.MainWindow">
    Welcome to Avalonia!
</Window>
DataContext
The d:DataContext property applies a DataContext to the preview. It is recommended that you use this property in conjunction with the {x:Static} directive to reference a static property in one of your assemblies:
<Window xmlns="https://github.com/avaloniaui"
        xmlns:x="http://schemas.microsoft.com/winfx/2006/xaml"
        xmlns:d="http://schemas.microsoft.com/expression/blend/2008"
        xmlns:dd="clr-namespace:My.Namespace;assembly=MyAssembly"
        d:DataContext="{x:Static dd:DesignData.ExampleViewModel}"
        x:Class="AvaloniaApplication1.MainWindow">
    Welcome to Avalonia!
</Window>
namespace My.Namespace
{
    public static class DesignData
    {
        public static MyViewModel ExampleViewModel { get; } = new MyViewModel
        {
            // View Model initialization here.
        };
    }
}
Design.DataContext
As an alternative to d:DataContext, you can use the Design.DataContext attached property.
<Window xmlns="https://github.com/avaloniaui"
        xmlns:x="http://schemas.microsoft.com/winfx/2006/xaml"
        xmlns:d="http://schemas.microsoft.com/expression/blend/2008"
        xmlns:dd="clr-namespace:My.Namespace;assembly=MyAssembly"
        x:Class="AvaloniaApplication1.MainWindow"
        Design.Width="100">
    <Design.DataContext>
        <dd:MyViewModel />
    </Design.DataContext>
    Welcome to Avalonia!
</Window>
Setting the design-time DataContext in code
The methods described above for setting the design-time DataContext assume the view model has a parameterless constructor. However, you may be required to have a view model constructor with parameters, such as with a typical dependency injection pattern. In such cases, you can use the Design.SetDataContext method to reference a view model constructor with parameters.
public MainWindow()
{
    // Prevent the previewer's DataContext from being set when the application is run.
    if (Design.IsDesignMode)
    {
        // This can be before or after InitializeComponent.
        Design.SetDataContext(this, new MainWindowViewModel(new DialogService()));
    }
    InitializeComponent();
}
Applying design-time data
Design-time data applies mock data to your UI in the XAML previewer. Like design-time properties, this helps you perfect your UI design by displaying realistic-looking data and removing the need to build the app or call the data service layer repeatedly.
In this example, we show you how to use design-time data with the MVVM pattern to create the UI of a appointment card. Here is the base functionality of the appointment system.
    // Data Properties
    public string ServerName { get; set; } = null!;
    public string ServiceTitle { get; set; } = null!;
    public decimal ServicePrice { get; set; }
    public DateTime ServiceDateTime { get; set; }
    public string Description { get; set; } = null!;

    // Commands
    private bool _isCancelVisible = true;

    public bool IsCancelVisible
    {
        get => _isCancelVisible;
        set => this.RaiseAndSetIfChanged(ref _isCancelVisible, value);
    }

    public ReactiveCommand<Unit, Unit> CancelAppointmentCommand =>
        ReactiveCommand.Create(() =>
        {
            IsCancelVisible = false;
        });
Creating the design view model
We now need to create a design version of the view model. This design version contains mock data, which can be referenced by a design DataContext.
public class DesignAppointmentViewModel: AppointmentViewModel
{
    public DesignAppointmentViewModel()
    {
        ServerName = "John Price";
        ServiceTitle = "Haircut and beard trim";
        ServicePrice = (decimal)25.5;
        ServiceDateTime = new DateTime(2023, 1, 3, 11, 15, 0);
        Description = "Please allow 30 minutes.";
    }
}
Referencing the design view model
The next step is to refer to the design view model we made in the previous section, so that it can populate the UI with mock data.
To do so using compiled bindings (default as of Avalonia version 11):
- In the opening XAML tag of your control, add
xmlns:vm="using:AvaloniaApplication1.ViewModels"to import theViewModelsnamespace. (Replace the example nameAvaloniaApplication1with your project name, if using a different one.) - Still in the opening XAML tag, add
x:DataType="vm:DesignAppointmentViewModel"to declare theViewModelclass. This is so the design-time environment can perform a type check on class properties.
Your XAML file should look something like this.
<UserControl xmlns="https://github.com/avaloniaui"
             xmlns:x="http://schemas.microsoft.com/winfx/2006/xaml"
             xmlns:d="http://schemas.microsoft.com/expression/blend/2008"
             xmlns:mc="http://schemas.openxmlformats.org/markup-compatibility/2006"
             xmlns:vm="using:DesignTimeData.ViewModels"
             mc:Ignorable="d" d:DesignWidth="400" d:DesignHeight="250"
             x:Class="DesignTimeData.Views.AppointmentView"
             xmlns:vm="using:AvaloniaApplication1.ViewModels"
             x:DataType="vm:DesignAppointmentViewModel">

   <Design.DataContext>
       <vm:DesignAppointmentViewModel/>
   </Design.DataContext>

</UserControl>
Designing the UI
You can now proceed with designing the UI for the appointment card. Here is an example UI.
<Border CornerRadius="10" Background="LightBlue"  Width="350" Margin="20">
  <DockPanel Width="350" >

    <StackPanel Height="10"
                    DockPanel.Dock="Bottom"
                    IsVisible="{Binding !IsCancelVisible, }" >
    </StackPanel>

    <Button Margin="0 10"
            HorizontalAlignment="Center"
            DockPanel.Dock="Bottom"
            ClickMode="Release"
            Command="{Binding CancelAppointmentCommand}"
            IsVisible="{Binding IsCancelVisible}">Cancel</Button>

    <StackPanel DockPanel.Dock="Left" Margin="10 10 0 0" Width="200" >
      <TextBlock Text="{Binding ServiceTitle}" FontWeight="Bold"/>
      <TextBlock Text="{Binding ServerName, StringFormat='with {0}'}"/>
      <TextBlock Margin="0 5 0 0"
                 Text="{Binding ServiceDateTime, StringFormat={}{0:dd MMM yyyy}}"/>
      <TextBlock Text="{Binding ServiceDateTime, StringFormat={}{0:HH:mm}}"/>
      <TextBlock Margin="0 5" FontSize="20"
                 Text="{Binding ServicePrice, StringFormat={}{0:£0.00}}"/>
      <TextBlock Text="{Binding Description, StringFormat={}{0:£0.00}}"/>
    </StackPanel>

    <Border DockPanel.Dock="Right"
      Background="Gainsboro" CornerRadius="10"
            Width="75" Height="75"
            Margin="0 20 20 0">
      <Image ToolTip.Tip="{Binding ServerName}" />
    </Border>

    <Rectangle/>

  </DockPanel>
</Border>
With the design view model set up, the in-progress UI is displayed with mock data in the XAML previewer, like so:

Have questions or feedback? Join the conversation below.